Arduino
First workshop
Assignment 3c
Make green LED blink twice as fast as yellow.

To create this assignment I played with time when specific LEDs were turning ON and OFF. As you can see in the code the scheme is this:
- both LEDs turn ON
- one second
- Green LED turns OFF, Yellows is all the time ON
- one second
- Green LED turns ON
- one second
- both LEDs turn OFF
- one second
With this scenario green LED blinks 2 times during 4 seconds, and yellow LED blinks only once. To make it happen I used delay(function) and HIGH and LOW states.
Assignment 4c
In this assignment we had to make one LED slowly fade in while other is fading out. To code this I only used one for loop with brightness as value that changed. However I had some problem with LED lights as they were not shinning really bright comparing to my friend's LEDs. Probably it was the problem of source of power, so his computer might have been giving more power.
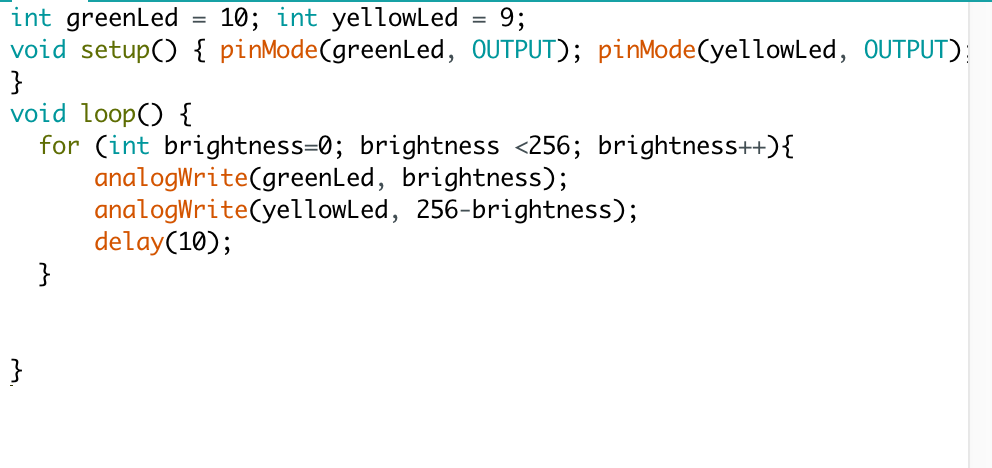
However if you will watch the video you will see that while yellow LED is fading out, the green LED is fading in. Look in the middle of LED where origin of the light is, in order to see it working.
Assignment 6c
In 6th assignment we were playing with other ways of input like potmeter. We wrote a couple of programmes where we used potmeter as input, so while we were turning potmeter with some degrees, output so LED lights were changing.
When it comes to assignment 6c:
6c: Change the code so that one LED fades in while the other fades out and vice versa.
From code side it was really similar to assignment 4c as outcome was the same. In 4th everything was happening automatically in the loop while in 6c we were in control of output. In this assignment I had the same problem with power of LEDs but again if you will look close you will see everything working.
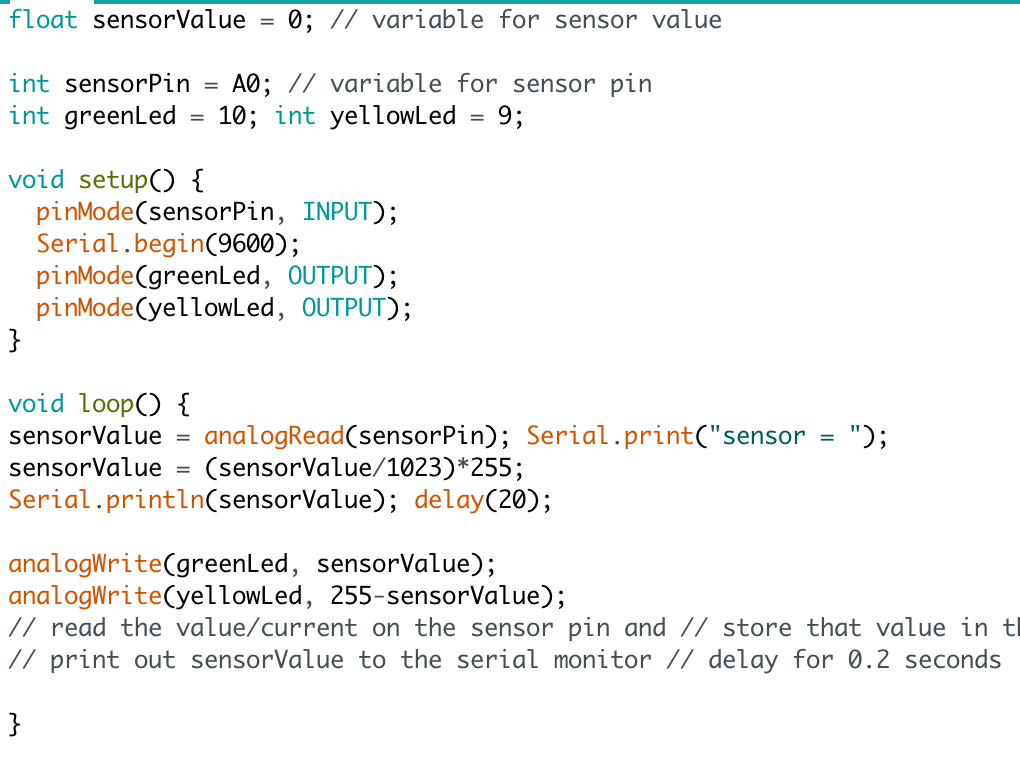
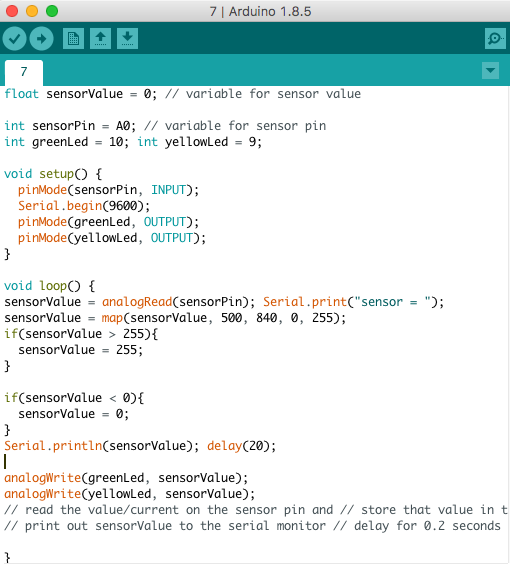
Assignment 7
In this assignment we used another input sensor - light sensor. I was really impressed that my Arduino kit included such sensors. While in 6 assignment I did not need to use the map() function, it was really useful in this assignment. With map() function I could say that value 500 given from sensor I want to be 0 for my programme, and vice versa value of 840 I want to be 255. This allowed me to make sure that my LED's are always between 0-255 range. To make sure that value never drops below 0 or above 255 I've used if statements.
On first video you can clearly see that LED lights are fading out when I'm giving less light to sensor.
On the second video you can see values (after map() function) which were displaying live on serial monitor.
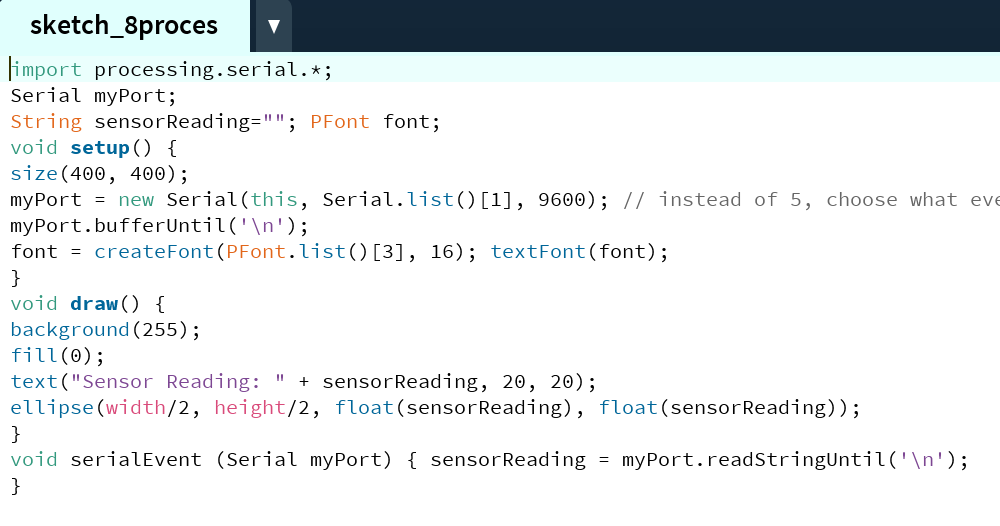
Assignment 8b
In this assignment we used again light sensor but we combined it with Processing. The goal was to control size of the circle in the Processing using light sensor on Arduino board. In this assignment we simply followed the instruction from PDF but it was nice to see how we can use Arduino in Processing.
Second workshop (week later)
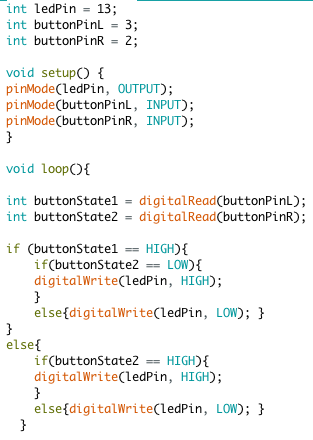
Assignment 9f
First assignment on second workshop involved more popular input options - buttons. In 9th assignment we played with one button and LEDs and later we added second button to code more complicated examples. Goal of assignment 9f was:
The LED lights up when one button of the two buttons is pressed, but not both.
On second workshop we also got more place to write our own code. To complete this assignment I used to if statements, where I was checking which buttons where pressed, if only one was pressed LED was lighting up.
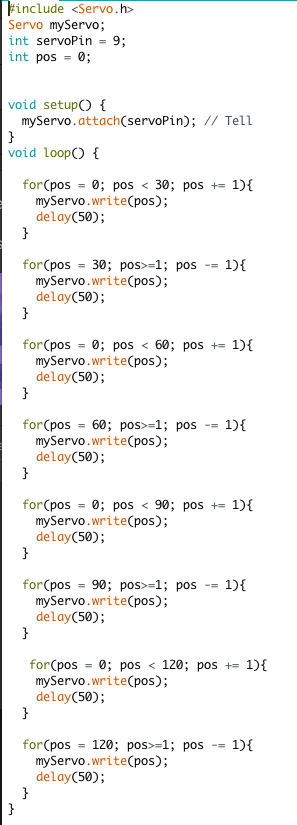
Assignment 10b
In assignment 10 we were using servomotor as output. In 10a we were changing its positions by 160 degrees and then going back again to 0 degrees. In 10b we had to:
Change the code in a way that the servo will move in a more interesting way. Try to make the servo move in a funny, rhythmical way. (or teach it how to dance)
In 10b I thought servomotor some kind of dance. I told it to move 30 degrees, then go back to 0, then move by 60 degrees, then again to 0 - I followed this scheme until 120 degrees. For every movement I used for loop and was changing values to make servomotor move more or less.
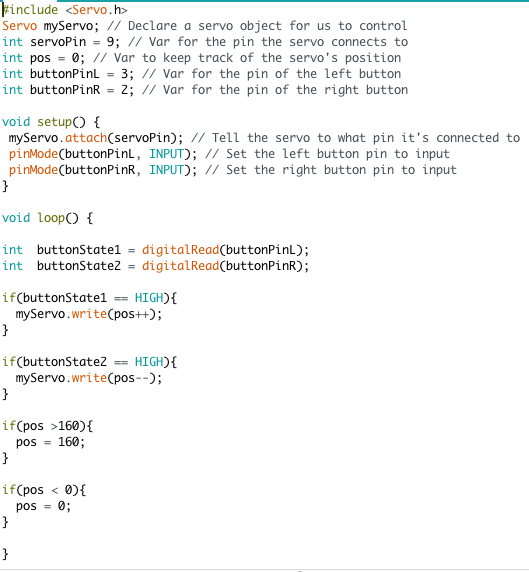
Assignment 11b
In this assignment we used other was of controlling servomotor than just telling it in code what to do. In 11a we used potmeter to change position of servomotor. In 11b we had to:
This circuit contains two buttons. These buttons should control the servo. One button should move the servo clockwise and the other counter-clockwise.
It was important to make sure that servo never move out of the 0-160 degree range. Again we received code as a starting point but rest of the code we needed to write ourselves. To make everything happen I used simple if statements. With two of them I was changing servo position with pos++ or pos-- and with other two if statements I made sure that servo never goes out of 0-166 degree range.
Assignment 12b
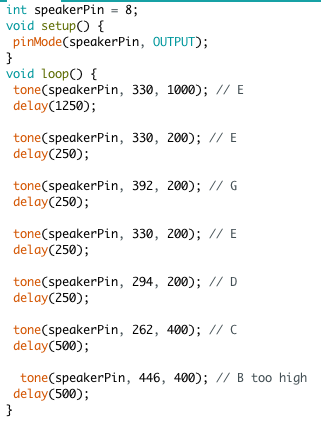
In 12th assignment we were playing with another component of our Arduino kit - speaker. It is another great way of output. In 12b we used the code from 12a and had to:
Change and expand on the code so that it plays a creative melody. You can use the diagram to choose your frequencies.
As mentioned in the assignment I used a diagram to create melody. I have basic knowledge of creating music and notes so I tried to recreate simple melody of White Stripes - Seven Nation Army
I played notes: E E G E D C B. I was playing with duration of notes and delays. The beginning of the melody seems ok, however there is something wrong with the end. Not really with the notes but with tenor probably.
Assignment 13e
Last assignment in my opinion was the hardest one. We needed to use Accelerometer and Gyroscope. At the beginning we needed to calibrate the gyroscope which was a big trouble for me. During workshop there was to many people who was hitting the table etc. making calibration impossible. However, at home it took me really long time to calibrate the device properly. However, after some time I managed to do it. In assignment 13e we used code from 13d:
Now change the Arduino code of 13d so that a tone sounds as soon as the accelerometer is (almost) level.
So basically the idea was that when we were moving Arduino speaker should not make any sound and if it was flat speaker should be giving sound. We received some tips how to do it:
- Tip1: To determine if something is level, use only the Pitch and the Roll.
- Tip2: If Pitch and Roll are both exactly 0, the accelerometer is perfectly level. But because that is hardly measurable, it is better to build in a margin. For example, the tone sounds when both Pitch and Roll are between -2 and 2 degrees.
- Tip3: Leave the Serial Monitor open so that you can always check the measured values during testing.
- Extra: If you really got the hang of this, you can also make a pitch-sensitive level. So the closer the measured values are to 0, the higher the pitch.
I followed the tips and after I understood everything it turned out to be really simple to write in code. Fun fact is that I added only 4 lines of code to 13d code.
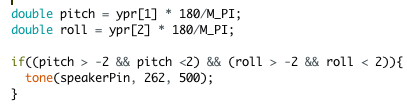
As you can see I added margin of mistake of 2 in the if statement. On the video you can also see how values change in Serial Monitor.